Pro-Tips on How to Photograph a Dancer
Part 1
In this article, I will briefly highlight some dance and ballet details that any professional dancers will IMMEDIATELY spot in a photo. I will give you a simple guide to some do's and don'ts when it comes to selecting a dance photo to turn into a final edit. Keep in mind that the technique behind our art form is hard to accurately capture! Any live action shot is going to be difficult, even if you feel the image you have is perfect. Ballet has such a specific and beautifully sophisticated rich history behind how the technique has evolved over the past 100's of years. Whether a professional photographer, hobbyists, or aspiring photographer, let me help guide you on how to pick images that highlight the best of both worlds in one great shot! From bottom to top here we go!
Pointe Class Video!
Pointe Class Video!
1. Placement of the Feet
You never want to capture a dancer with what (in either a static pose or jump shot) we would call a "sickled" foot. Below you will find a picture of the proper ankle alignment for several critical positions vs. what "sickled" means. In layman's terms, think of this foot position looking similar to a broken ankle. You also want to make sure during static or actions shots you are capturing a dancer when they are entirely "on pointe" over the arches of their feet. You do not want to post images that are a quarter of a second before or after they hit full pointe. Below you will find examples of being entirely over the arches/box of one's pointe shoes vs. the quarter of a second prior. It is imperative to make sure a dancer is over the box of their shoe!
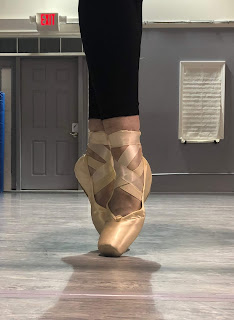
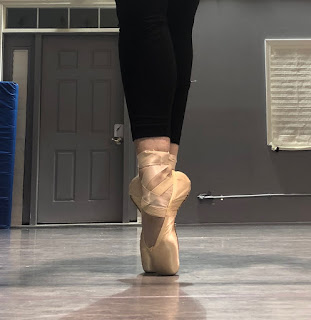
The first image is an example of the quarter of a second prior to when I arrive in full sous-sus position. You do not want to select this image. The second image shows my feet when they have arrived in the proper position for sous-sus with the feet fully articulated over the box of the shoe.
The first image is an example of the quarter of a second prior to my feet arriving fully over the box of the shoe in secondé position on relevé. The second photo highlights the proper alignment of the foot and ankle in this position.
The above photo is an example of being fully over ones pointe shoes. The feet are beautifully arched and pointed.
The above photo is an example of a "sickled" foot. Note how the ankle of the working foot essentially looks like it is broken. The supporting foot is not on full relevé over the box of the pointe shoes. This would be an example of a photo that would be no good to use and post.
2. Placement of the Feet Continued
You always want to make sure the shots you are selecting captures the dancer's feet at their full pointed position. This pertains especially to "jump" shots (although is also reiterating #1 above). When a dancer's foot is not at its full extension, we call this a "biscuit" foot during jump shots or even in positions like tendu. An excellent person to follow on Instagram is @biscuitballerina. Through the use of humor, she highlights this very elegantly. I have highlighted below (with permission from the photographer) a jump shot where my feet are at their fullest extent and a blooper shot where I was coming down from the jump.
The first image is an example of my foot when I am just beginning to descend from my jump. Note how the foot is not fully extended. The arch is not engaged and fully pointed. This would be an example of a photo that would not be wise to select for a final edit. In the second photo, the arch of my foot is fully engaged and pointed. I am at the apex of my jump.
Check out part 2 of how to photograph a ballerina!
Check out part 2 of how to photograph a ballerina!


Thank you. I'm sure this will be useful to many photographers.
ReplyDeleteI hope so :) That is the goal! I can not wait to see you and work together again Jerry. One of our photos is in part 2 :) For a good example :)
DeleteVery nice, can't wait for more!
ReplyDeleteThank you so much! Excited to work with you again :)
DeleteThank you for sharing this guide. It will be very helpful!
ReplyDeleteYou are welcome! :)
DeleteGreat article!!
ReplyDeleteThank you so much!
DeleteBeautiful tutorial, keep solid work.
ReplyDelete